For several reasons it may be useful to add more than one BIM model to the same report or duplicate the existing one. Let’s see how easy it is to do this with Vcad.
Duplicate the existing model
The reasons why you might need to duplicate the Vcad viewer in Power BI and thus the model it contains are many. For example, to use the same model linked to different data sources or to make comparisons based on different parameters.
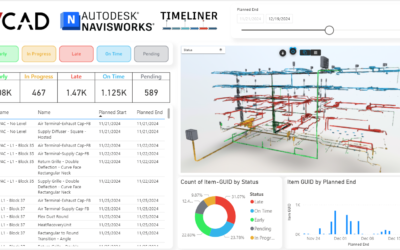
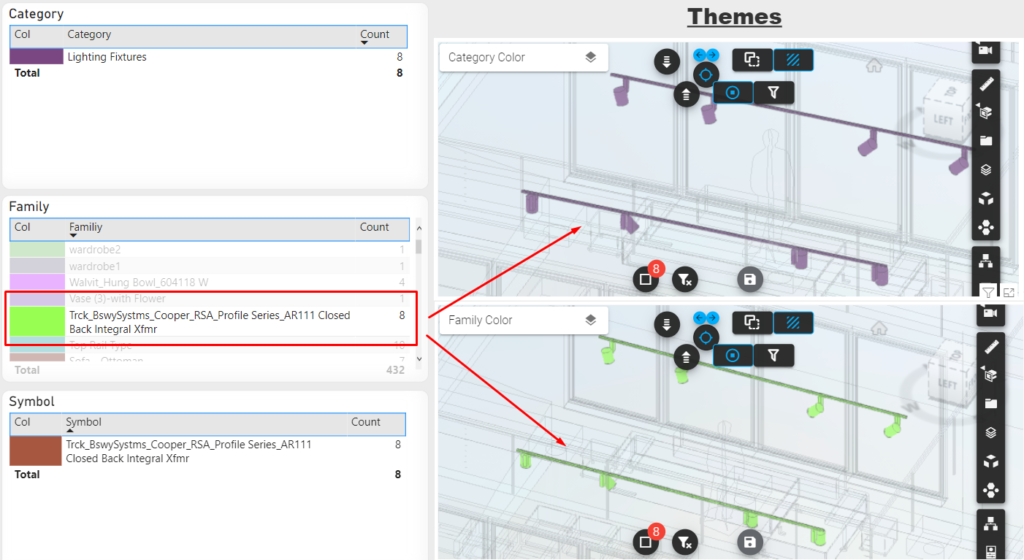
In this case, the steps are very simple, we will take as a reference one of our templates containing a Revit file to get the result of the image below.
A simple copy and paste is all that is needed to duplicate the viewer. At this point, by making a selection in one of the visuals containing the data, both models will react the same way as they are linked to the same dataset.
Such a report makes little sense, but let us see how to duplicate the dataset to have, for example, the ability to make different and independent data selections between the two models.
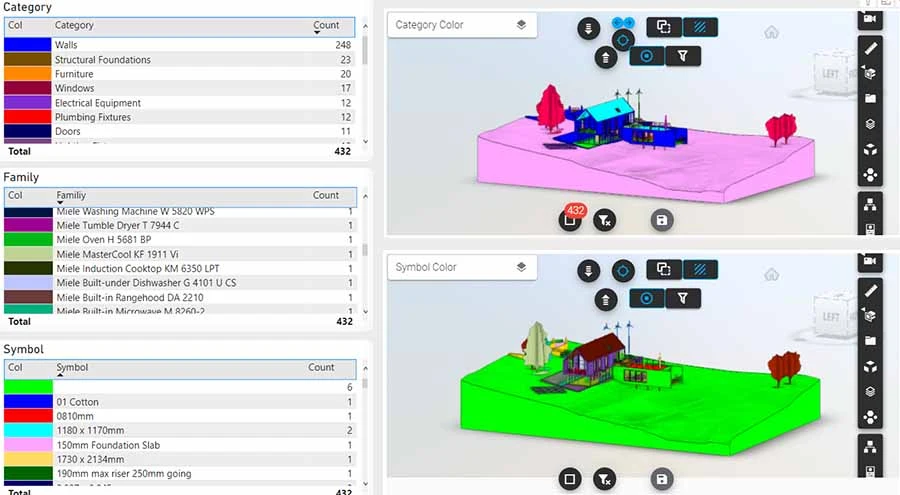
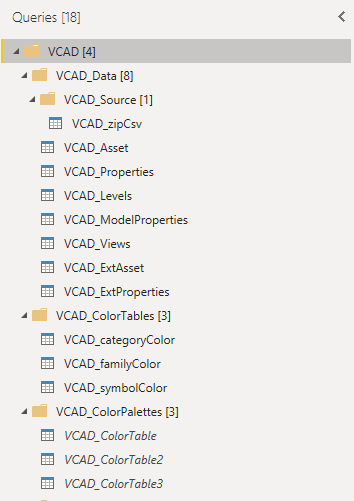
Again, just copy and paste the table highlighted in the image below from TRANSFORM DATA in Power BI desktop.
N.B. Once the tables have been duplicated, the correct relationships must be reestablished. When the dataset is duplicated, relationships are also automatically established between the new and old tables, so it is necessary to recreate the relationships so that the two datasets are independent of each other. This is because otherwise the two models in the viewers would continue to react the same way to a selection.
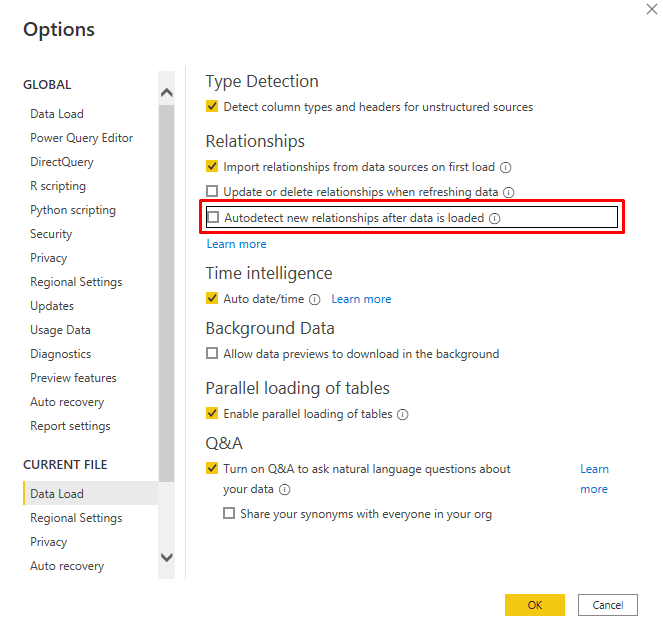
Alternatively, the option “Autodetect new relationship after data is loaded” can be unchecked. When you duplicate the dataset, the relationships will not be applied automatically and you can then establish them by hand.
Finally, all bindings between the duplicate viewer must be changed so that they are linked to the new tables.
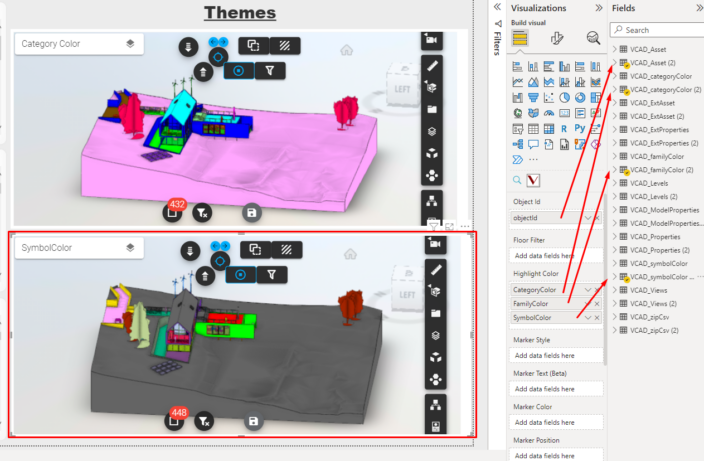
At this point you can add other data visuals each connected to a specific viewer.
Add a different model
If, on the other hand, we wanted to import a different model into a report that already contains a BIM model, the operations to do are different, but nothing complicated. Our blog contains three articles on how to import Vcad into an existing report.
The first thing to do, as in the previous case, is to duplicate the Vcad viewer that will then need to be linked to the new model. Below are the guides to do this depending on the version of Vcad and the type of viewer used.
Vcad Standalone with the Open viewer
After duplicating the Vcad viewer…
Step A: Importing the extracted model data
To import the model data Vcad has extracted you need to download any of the templates that Vcad makes available to users.
N.B. You will need to have already imported a model into Vcad in order to download a PBI Template.
Then after opening the downloaded template, you will open the “Transform data” section.
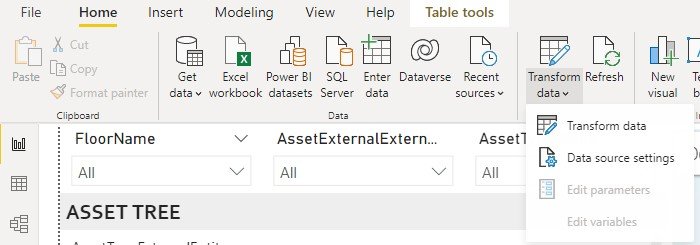
From there, select all present tables, right click and “copy”.
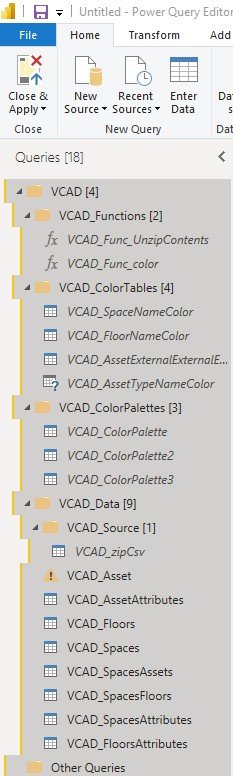
After that just open the “Transform data” section in your existing report, right click on the left column and “Paste”. Now your report will contain all the tables with the data extracted from Vcad.
N.B. Once the tables have been duplicated, it is necessary to reestablish the correct relationships. For this purpose, the same considerations described in the first part of the article apply.
Step B: Setting up the custom visual
Now you have to configure the custom visual. It will only take a few simple operations, which differ based on the type of version used.
In this article we will see how to import Vcad for using: Standard Vcad with the Open viewer.
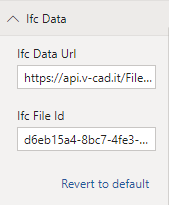
First you need to setup the File ID to use for the custom visual, this is the information that will allow the interaction of the model with the rest of the data in the report. To do so, select the custom visual and enter the File Id in the Ifc File ID field in the Vcad custom visual options.
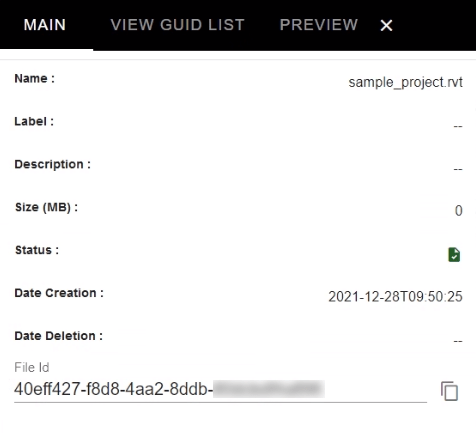
The File Id of the new file can be retrieved by clicking the INFO icon in the list of uploaded files at the file itself.
If the model is not immediately displayed just switch between pages in Power BI so that the custom visual Vcad is reloaded.
Doing so will populate the Ifc File Id field in the Ifc Data tab in the Vcad options. This code identifies the model to be used in the custom visual.
N.B. Make sure to select the model that matches the model data that was imported in step A.
For some ideas on how to get started creating powerful reports, click here to learn how to assign colors to model assets.
Vcad Standalone with the Autodesk Forge® viewer
After duplicating the Vcad viewer…
Step A: Importing the extracted model data
To import the model data Vcad has extracted you need to download any of the templates that Vcad makes available to users.
N.B. You will need to have already imported a model into Vcad in order to download a PBI Template.
Then after opening the downloaded template, you will open the “Transform data” section.
From there, select all present tables, right click and “copy”.
After that just open the “Transform data” section in your existing report, right click on the left column and “Paste”. Now your report will contain all the tables with the data extracted from Vcad.
N.B. The Power BI dataset created from an .ifc file is different from that created using other file formats, for example with .rvt, .nwd, .nwc file formats.
N.B. Once the tables have been duplicated, it is necessary to reestablish the correct relationships. For this purpose, the same considerations described in the first part of the article apply.
Step B: Setting up the custom visual
Now you have to configure the custom visual. It will only take a few simple operations, which differ based on the type of version used.
In this article we will see how to import Vcad for using: Standard Vcad with the Autodesk Forge® viewer.
First you need to setup the File ID to use for the custom visual, this is the information that will allow the interaction of the model with the rest of the data in the report. To do so, select the custom visual and enter the File Id in the Ifc File ID field in the Vcad custom visual options.
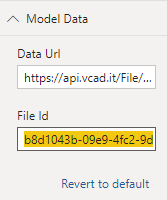
The File Id of the new file can be retrieved by clicking the INFO icon in the list of uploaded files at the file itself.
If the model is not immediately displayed just switch between pages in Power BI so that the custom visual Vcad is reloaded.
Doing so will populate the File Id field in the Model Data tab in the Vcad options. This code identifies the model to be used in the custom visual.
N.B. Make sure to select the model that matches the model data that was imported in step A.
For some ideas on how to get started creating powerful reports, click here to learn how to assign colors to model assets.
Vcad for Bim 360/ACC
After duplicating the Vcad viewer…
Step B: Importing the extracted model data
To import the model data Vcad has extracted you need to download any of the templates that Vcad makes available to users.
N.B. You will need to have already imported a model into your Autodesk Bim 360® DOcs manager in order to download a PBI Template.
Then after opening the downloaded template, you will open the “Transform data” section.
From there, select all present tables, right click and “copy”.
After that just open the “Transform data” section in your existing report, right click on the left column and “Paste”. Now your report will contain all the tables with the data extracted from Vcad for Bim 360®.
N.B. The Power BI dataset created from an .ifc file is different from that created using other file formats, for example with .rvt, .nwd, .nwc file formats.
N.B. Once the tables have been duplicated, it is necessary to reestablish the correct relationships. For this purpose, the same considerations described in the first part of the article apply.
Step B: Setting up the custom visual
After importing the .pbviz file and model data into the report, you have to configure the custom visual. It will only take a few simple operations, which differ based on the type of version used.
In this article we will see how to import Vcad for using: Vcad for Bim 360®.
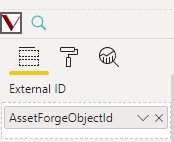
First you need to setup the Externail ID to use for the custom visual, this is the information that will allow the interaction of the model with the rest of the data in the report. To do so, select the custom visual and enter the AssetForgeObjectId field of the VCAD_Asset table in the Externail ID field in the Vcad custom visual options.
After that, select the file you want to use in Vcad for Bim 360® and copy the Vcad ID by opening the ADDITIONAL INFO tab in the right-hand column. The one shown in the screenshot below, in this example part of it is hidden.

Then, copy the Vcad ID into the FILE ID field in the custom visual options under the MODEL DATA tab.
N.B. Make sure to select the ID of the model that matches the model data that was imported in step B.
For some ideas on how to get started creating powerful reports, click here to learn how to assign colors to model assets.
Using Autodesk Forge® viewer you can also add files in different formats to the same report. If the new file you are importing is in Revit format you must also add the GUID of the view in the “View Guid” field in the “Forge options” of the Vcad custom visual.
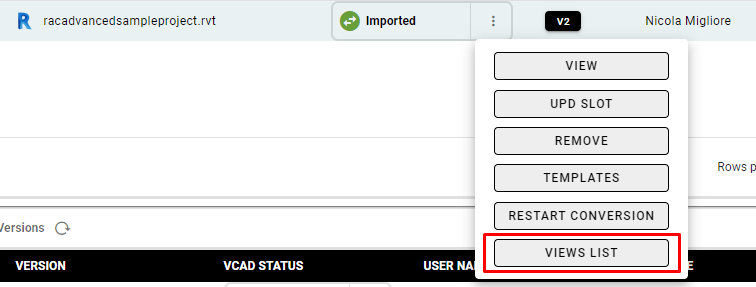
You can retrieve the VIEW GUID by clicking the INFO icon, in Vcad standalone
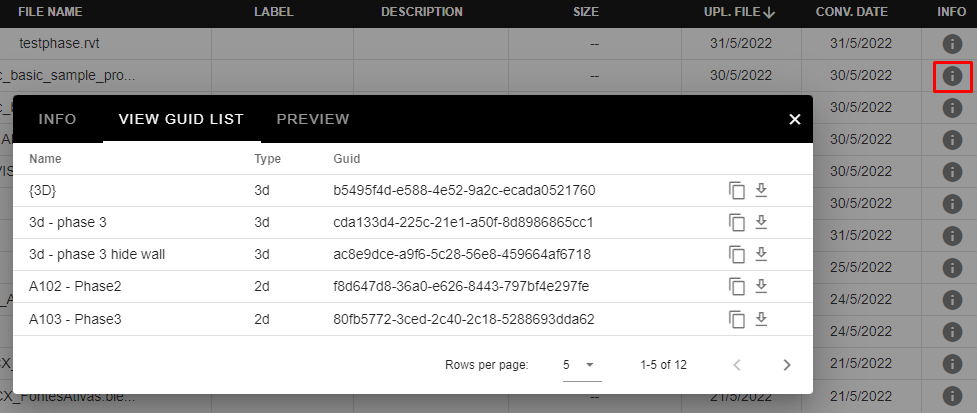
or by clicking the VIEW LIST button, if you are using Vcad for BIM360/ACC.
NOTES
- With the Open viewer you can only use files in IFC format.
- The VIEW GUID only needs to be entered for Revit files.
- When using the Vcad Forge viewer, you can import different formats picking from those supported by Vcad: IFC, RVT, NWD, NWC, OBJ, STL and DWG.
- By following the instructions described in the article, it is possible to import different files on different pages in the same report.